


Today you’ll see how to export multiple tables to Parquet files in Azure Data Lake Storage with Azure Synapse Analytics Workspaces using Azure Data Factory.
I will run you through how to export the tables from a Adventure Works LT database to Azure Data Lake Storage using Parquet files. This tutorial is valid for Azure Data Factory in Azure Synapse Analytics Workspaces or standalone service.
Table of Contents
Pre-requirements
Before you begin, in order to best benefit from this tutorial, I suggest that you have a look at my previous blog first here.
Are we doing incremental loads? Not at this stage, but look for this topic in upcoming blog posts.
Modify Parquet Dataset
To start, the first thing you need to do is modify your destination parquet dataset to be more generic by creating a FileName parameter.
Add a parameter

Modify the file name using dynamic content. The file format is FileName_yyyyMMdd.parquet and the folder location is:
- Dlfs
- Demos
- AdventureWorks
- YYYY
- YYYYMM
- YYYYMMDD
- YYYYMM
- YYYY
- AdventureWorks
- Demos
@{formatDateTime(utcnow(),'yyyy')}/@{formatDateTime(utcnow(),'yyyyMM')}/@{formatDateTime(utcnow(),'yyyyMMdd')}/@{concat(dataset().FileName,'_',formatDateTime(utcnow(),'yyyyMMdd'),'.parquet')} 
Modify Pipeline
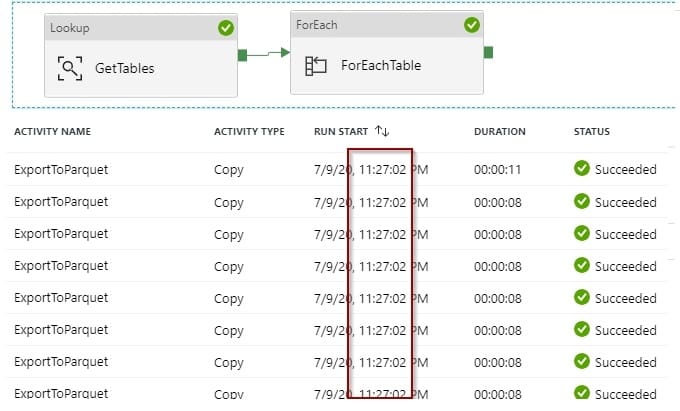
One of the most amazing features in Azure Data Factory is that parallelism is enabled by default. Working with multiple data inputs and outputs is really easy using dynamic expressions.
We want to include a lookup and “for each” activity. Inside the “for each” activity, you can move the “ExportToParquet” activity.

Lookup Definition
In settings I’m using the INFORMATION_SCHEMA.TABLES (you can use sys.tables) to get all the tables that I want to import.
Information_Schema
select Table_schema, Table_name from information_schema.tables

where table_type ='BASE TABLE'

and table_schema='SalesLT'
Sys.tables
select Table_schema = schema_name(schema_id), Table_name = name

from sys.tables

where schema_name(schema_id) ='SalesLT' 
This query will retrieve the table schema and table name.

ForEachTable Definition
There isn’t much that we need to define here, just a good name and the items that we can loop through (tables in this case).

@activity('GetTables').output.value 
Next, you’ll modify the “ExportToParquet” activity.
Modify Copy Activity
Now it’s time to modify the copy activity and publish the changes.
Source
Change the query by using dynamic content. If your source column names have spaces, check out this blog post on exporting Parquet Files with Column Names with Spaces.
@concat('select * from ',item().Table_Schema,'.',item().Table_Name) 
Sink
Change the dataset and include dynamic content for the file name parameter.
@concat(item().Table_Schema,'_',item().Table_Name) 
Publish the changes
You are ready to publish the changes. However, I suggest debugging first!

Execute and monitor
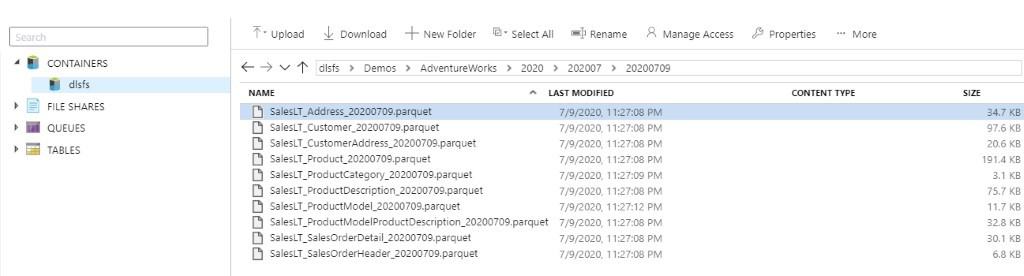
Finally, after executing the pipeline successfully, you’ll find all the files in your Azure Data Lake in Parquet format.

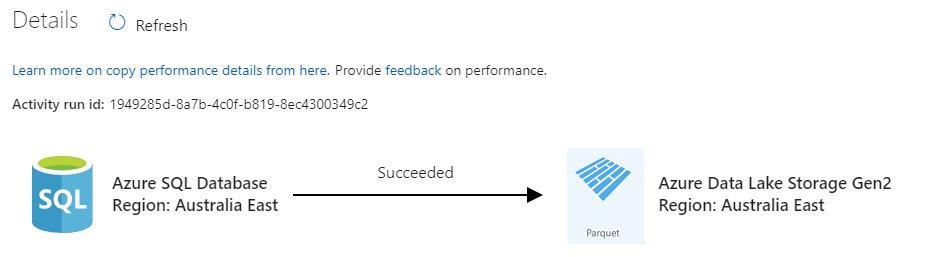
After that, if you click on the activity, you are able to find the details for each of the tables.

There is one file per table.
Final Thoughts
To sum up, it only takes a few minutes to start developing enterprise data movement pipelines using native built-in features in Azure Data Factory. I remember a few years ago, I was building complex frameworks in SQL Server Integration Services to handle these scenarios. Luckily, those days are gone!
What’s Next?
Next up, in my next blog post, I’ll show you how to consume information in Notebooks and the different options available when you use them.

9 Responses
Marcus
25 . 01 . 2021How do you go around Parquet not accepting spaces in the column names? Are you able to affect that somehow in the pipeline prior the load to parquet?
David Alzamendi
01 . 02 . 2021Hi Marcus,
I wrote about this, thank you for your idea!
https://davidalzamendi.com/parquet-files-column-names-with-spaces/
You could use some dynamic SQL to get rid of the spaces when running the query on the source system by using aliases. Depending on your source system, you can generate the “select” statement in a previous activity like a lookup activity, and then pass the output of that activity to the Copy Activity to be used as the query for the source system.
A good example of dynamic SQL with T-SQL.
DECLARE @s VARCHAR(500)

DECLARE @tablename VARCHAR(500) ='Store'
SELECT @s = ISNULL(@s+', ','') + '[' + c.name + ']' + ' as ['+replace(c.name,' ','')+'] '
FROM sys.all_columns c join sys.tables t
ON c.object_id = t.object_id
WHERE t.name = @tablename
SELECT 'select ' + @s + ' from ' + @tablename
Let me know if I can expand this answer, thank you for reading the blog post.
Rob
29 . 01 . 2021Very helpful David. Thanks. I wonder if you can help – If you want to daily land all tables from an OLTP system into the lake, what are the pros and cons of each of the below structure
1. Database Name – yyyy – yyyyMM – yyyyMMdd – Files
2. Database Name – Table Name – Files with date suffix
David Alzamendi
01 . 02 . 2021Hi Rob,
Thank you for reading the article!
Good question, each option could be valid depending on your scenario, but from my own experience I can highlight a few differences:
Option 1:
Pros
• Easier to organise and navigate
• A lower number of folders is always better, you know that there is 1 folder per day, so it is easier to consume. You know that if you want to query data from yesterday, you just go to 1 folder.
• Easier to archive, just imagine that you want to archive 1 year of data, you just move the folder
Cons
• You could end up with a large number of files in a single folder
• Granting access to specific tables is more challenging
Option 2:
Pros
• Easier to grant and deny access to specific tables (folders)
Cons:
• You could end up with a really large number of folders, some OLTP systems have many tables, which will be harder to consume and navigate
• More difficult to join the datasets when using data frames or synapse serverless.
Regards,
David
Jeffrey Erickson
11 . 09 . 2021I ran through this tutorial using the Azure Data Factory (standalone service). Thanks!
Did you ever address incremental loads in a post? I have yet to see a good tutorial to ingest from all database tables incrementally to Azure Data Lake Storage parquet files. This seems like a common scenario for a raw/bronze zone that would have a straightforward solution…
I have reviewed https://docs.microsoft.com/en-us/azure/data-factory/tutorial-incremental-copy-overview and the least bad option seems to be ‘Loading new files only by using time partitioned folder or file name’. Maybe saving the end date of a queried date range in the file name, which is used as the start date in the next query for incremental data (based on a last modified date in the tables)?
David Alzamendi
17 . 09 . 2021I am happy to walk you through a solution that I have, but I haven’t written about it. Send me an email to [email protected] and we schedule a workshop!
Fahim
16 . 09 . 2021Hi David,
Tried to implement this and ran into some issues when trying to read nvarchar(max) columns with all kinds of special characters in them – like [DOUBLEQUOTE], [SINGLEQUOTE], CRLF, etc. The parquet files won’t successfully write out due to parsing errors.
Wonder if you have a solution-option for this scenario?
Cheers,
Fahim.
David Alzamendi
17 . 09 . 2021Hi Fahim,
I haven’t run into that scenario with this specific solution before, I did run into it when working with delimited files but not with tables/parquet files.
If you provide a value sample of a row/column, I can try reproducing it
Regards,
David
Amy
13 . 11 . 2021Hi David,
Thank you so much for these articles. When I right click on parquet files in Data Lake Storage Gen2 after following your tutorials – I would like to create an external table, the options to do so are not available, nor to use the notebook either. Only option is new SQL script BULK LOAD. Does it have to do with the parameters set? I am assuming when we bulk load the files – the schema is not attaching as well? any ideas? (side note: I am super green and learning so I hope this makes sense) Many thanks!!